Battery switch on travel trailer function is crucial for managing your RV’s power. Understanding how this switch works – whether it’s a simple 1-2-both or a more sophisticated rotary model – is key to preventing electrical issues and maximizing your battery life. This guide will walk you through the operation, troubleshooting, maintenance, and even installation of your travel trailer’s battery switch, ensuring you’re ready for any adventure.
We’ll cover everything from the different types of switches available and how to properly connect and disconnect your batteries, to diagnosing common problems and performing essential maintenance. We’ll also delve into the impact the battery switch has on various systems within your travel trailer, like lights, appliances, and the water pump, helping you understand how to best manage power consumption for optimal performance.
Safety is paramount, so we’ll cover important safety precautions throughout.
Understanding Battery Switch Functionality in Travel Trailers: Battery Switch On Travel Trailer Function
Your travel trailer’s battery switch is a crucial component for managing power, allowing you to select between different power sources and prevent accidental drain. Understanding its operation is key to enjoying reliable power on the road.
Types of Battery Switches
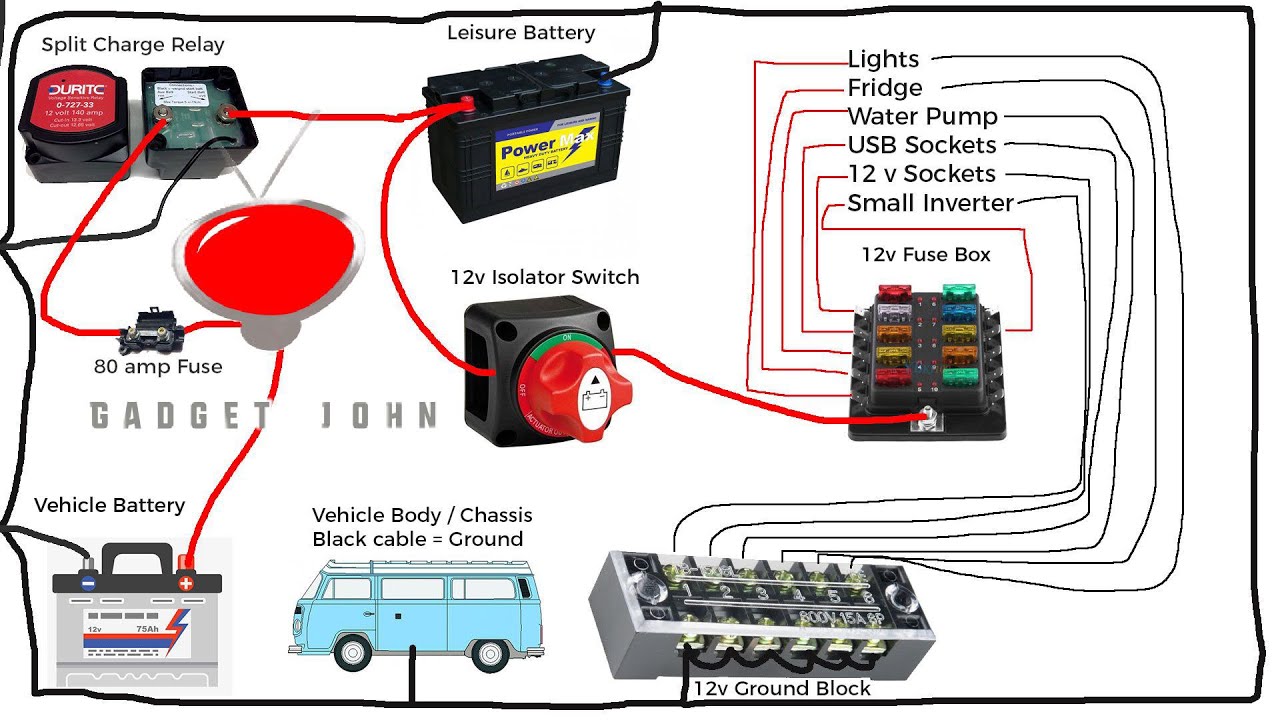
Travel trailers typically utilize two main types of battery switches: 1-2-Both switches and rotary switches. 1-2-Both switches offer a simple, three-position system, while rotary switches provide more granular control over multiple batteries or circuits. Choosing the right switch depends on your trailer’s setup and your power management needs.
Battery Switch Purpose and Power Source Management, Battery switch on travel trailer function
The primary purpose of a battery switch is to control the flow of power from your trailer’s batteries to the various 12-volt appliances. It acts as a central hub, allowing you to select between different power sources: shore power (hookups at campsites), generator power, and your house batteries. This prevents accidental draining of your batteries when connected to shore power or a generator, and allows you to selectively charge your batteries.
Proper use ensures your batteries are only discharged when you intend them to be.
Operating a Battery Switch: A Step-by-Step Guide
Before operating the switch, always ensure you understand your trailer’s specific wiring and power sources. Incorrect operation could lead to damage.
- Identify the Switch: Locate your battery switch; it’s usually near your battery bank or inside a convenient access panel.
- Understand the Positions: Familiarize yourself with the switch’s positions (e.g., “1,” “2,” “Both,” “Off”). The specific labels may vary depending on the manufacturer and type of switch.
- Select the Desired Source: Choose the appropriate position based on your power needs. “1” might connect to the first battery bank, “2” to the second (if applicable), “Both” connects to both banks, and “Off” disconnects all batteries from the system.
- Check Your Appliances: After changing the switch position, verify your appliances are functioning as expected. If there’s a problem, double-check the switch position and your other power connections.
Comparison of Battery Switch Types
The following table compares the advantages and disadvantages of 1-2-Both and Rotary switches:
| Feature | 1-2-Both Switch | Rotary Switch | Notes |
|---|---|---|---|
| Cost | Generally less expensive | Typically more expensive | Price varies greatly based on brand and features. |
| Complexity | Simple to understand and operate | Can be more complex with multiple positions | Rotary switches often allow for more refined control. |
| Control | Basic on/off control for each battery bank or both | Offers more precise control over individual circuits or battery banks | Useful for managing multiple batteries or sensitive equipment. |
| Durability | Generally durable, with fewer moving parts | Durability varies depending on the quality and design | Proper maintenance extends the lifespan of any switch. |
Troubleshooting Common Battery Switch Issues
Dealing with a non-functional battery switch in your travel trailer can be frustrating, but systematic troubleshooting can usually pinpoint the problem. This section will guide you through common issues and their solutions, helping you get back on the road quickly and safely.
Problems with your battery switch typically manifest as a complete lack of power, blown fuses, or the inability to switch between batteries correctly. This can be caused by a variety of factors, from loose connections to faulty components within the switch itself. Proper diagnosis is crucial to ensure a safe and effective repair.
Identifying the Source of the Problem
Before you start troubleshooting, it’s important to precisely define the issue. Is there absolutely no power at all? Are certain circuits working, but others aren’t? Does the switch itself feel loose or damaged? Careful observation is the first step to a successful repair.
Knowing exactly what isn’t working helps you narrow down the possible causes. For instance, if only one battery bank is working, the problem might lie within the switch itself or its connection to the non-functional bank. If there’s no power at all, you need to investigate the broader electrical system.
Checking Battery Connections and Fuses
Safe and careful inspection of your battery connections and fuses is paramount. Always disconnect the negative terminal of your battery before working on any electrical components. This is a critical safety precaution to prevent accidental shorts and potential injury.
To check battery connections, visually inspect the terminals for corrosion, looseness, or damage. Clean any corrosion with a wire brush and ensure the connections are tight. Pay close attention to both the positive (+) and negative (-) terminals of both your house battery and your vehicle battery. Loose or corroded connections are a very common cause of electrical problems in travel trailers.
So, you’re an audiophile who travels? Awesome! Check out this guide on creating the perfect audiophile travel setup to ensure your listening pleasure isn’t compromised on the road. Before you jet off, though, remember travel insurance is key. Getting Aon travel insurance gives you peace of mind knowing you’re covered for unexpected events, allowing you to focus on enjoying your trip and your amazing tunes.
Happy travels!
Fuses are designed to protect your electrical system from overloads. Check all fuses related to your battery system, using a multimeter to test continuity. A blown fuse will show no continuity (an open circuit). If you find a blown fuse, replace it with a fuse of the same amperage rating. However, before replacing the fuse, investigate why it blew in the first place; a recurring blown fuse indicates a more serious underlying problem in your electrical system.
Troubleshooting Flowchart
The following flowchart Artikels a systematic approach to troubleshooting a non-functional battery switch:
[Imagine a flowchart here. The flowchart would start with a box: “No Power/Battery Switch Malfunction?”. This would branch to “Check Battery Connections” (yes/no). If yes, then “Clean/Tighten Connections”. If no, then it would branch to “Check Fuses” (yes/no).
If yes, then “Replace Blown Fuses”. If no, then it would branch to “Inspect Battery Switch for Damage” (yes/no). If yes, then “Replace Battery Switch”. If no, then it would branch to “Test Battery Voltage” (yes/no). If yes, then “Check Wiring to Battery Switch” (yes/no).
If yes, then “Repair/Replace Wiring”. If no, then it would lead to “Consult a Professional”. Each box would have arrows indicating the flow.]
Connecting and Disconnecting Batteries
Properly connecting and disconnecting your travel trailer batteries is crucial for safety and to avoid damaging your electrical system. This section will guide you through the correct procedures, highlight potential hazards, and list the necessary tools. Remember, always prioritize safety when working with batteries.
Before you begin any work on your batteries, ensure the power is completely disconnected at the battery switch. This prevents accidental shorts and protects you from electric shock. Always wear appropriate safety glasses to protect your eyes from potential battery acid splashes.
Connecting Batteries to the Switch
Connecting your batteries to the switch is straightforward but requires careful attention to detail. First, locate the positive (+) and negative (-) terminals on both your battery and the battery switch. The positive terminal is usually marked with a “+” symbol or red color coding. The negative terminal is usually marked with a “-” symbol or black color coding.
Connect the positive cable from the battery to the positive terminal on the switch, then connect the negative cable from the battery to the negative terminal on the switch. Tighten all connections securely using a wrench to prevent loose connections and potential sparking. Never connect the negative cable before the positive cable.
Disconnecting Batteries from the Switch
Disconnecting your batteries follows a similar process, but in reverse order. First, disconnect the negative cable from the negative terminal on the switch. Then, disconnect the positive cable from the positive terminal on the switch. Again, ensure all connections are properly loosened before removing the cables. This prevents accidental shorts or sparks.
Properly storing disconnected batteries in a cool, dry place will extend their lifespan.
Jump-Starting a Travel Trailer Battery
If your travel trailer battery is dead, you can jump-start it using jumper cables and another vehicle’s battery. However, it’s crucial to follow the correct procedure to avoid damaging both batteries or causing injury. First, ensure both vehicles are turned off. Connect one red jumper cable clamp to the positive (+) terminal of your vehicle’s battery. Then, connect the other red clamp to the positive (+) terminal of your travel trailer battery.
Next, connect one black jumper cable clamp to the negative (-) terminal of your vehicle’s battery. Finally, connect the other black clamp to an unpainted metal surface on your travel trailer’s chassis, away from the battery. This prevents sparks near the battery. Start the vehicle and then try starting your travel trailer. After successful starting, disconnect the jumper cables in the reverse order of connection.
So, you’re an audiophile who travels? Awesome! Check out this guide on creating the perfect audiophile travel setup to ensure your tunes sound amazing on the go. It’s all about packing smart and choosing the right gear. And while you’re planning your trip, remember to sort out travel insurance – securing Aon travel insurance is a good idea for peace of mind, especially if you’re carrying expensive equipment.
Don’t forget to double-check your coverage for lost or damaged items!
Hazards of Incorrect Battery Connection
Incorrectly connecting batteries can lead to several hazards. These include: short circuits, which can cause sparks, heat, and even fires; battery acid spills, which can cause skin burns and damage clothing; and electric shocks, which can cause injury or even death. Always follow the correct procedures and take necessary safety precautions.
Tools Needed for Battery Maintenance and Switch Operation
A few essential tools will make battery maintenance and switch operation safer and easier.
This list covers the basics for most situations. Always refer to your specific trailer and battery’s manual for detailed recommendations.
- Wrench (appropriate size for your battery terminals)
- Jumper cables (heavy-duty, properly insulated)
- Safety glasses
- Gloves (rubber or insulated)
- Battery terminal cleaner
Impact of Battery Switch on Travel Trailer Systems

The battery switch is the central control point for your travel trailer’s DC power. Understanding its function and impact on various systems is crucial for safe and efficient operation. A properly functioning switch ensures you can easily select power sources and protect your batteries and appliances.Your battery switch acts as a gatekeeper, determining which power source feeds your trailer’s 12-volt systems.
In the “off” position, all DC power to the trailer is disconnected, protecting your batteries from drain. Switching to “battery” sends power directly from your house batteries to run lights, water pumps, and other 12-volt appliances. Switching to “both” allows you to charge your house batteries while simultaneously using them. The “off” position is key for long-term storage to prevent battery drain.
Battery Switch and the Charging System
The battery switch’s interaction with the charging system is vital for maintaining battery health. When the switch is in the “both” position, the converter/charger receives power from the shore power connection (your campsite’s electrical hookup). This converter then charges the house batteries. If the switch is in the “battery” position while connected to shore power, the converter will not charge the batteries.
In essence, the switch acts as an on/off switch for the charging process from shore power. Proper management of these positions is critical for maximizing battery life and avoiding damage.
Power Consumption Management for Extended Battery Life
Efficient power management is key to maximizing battery life. Understanding your trailer’s power draw is important. Appliances like air conditioners and microwaves draw significantly more power than lights or a water pump. Prioritize the use of higher-power appliances when connected to shore power. Consider using LED lighting instead of incandescent bulbs to conserve power.
Regularly checking your battery voltage can help identify potential issues before they lead to a dead battery.
Impact of a Faulty Battery Switch on Travel Trailer Systems
A malfunctioning battery switch can cause various problems. A switch stuck in the “on” position can lead to a completely drained battery bank, leaving you without power. If it’s stuck in the “off” position, you’ll have no power to your 12-volt systems, regardless of whether your batteries are charged or not. A faulty switch can also cause intermittent power issues, leading to inconsistent operation of lights, water pumps, and other appliances.
In some cases, a faulty switch might even cause a short circuit, potentially damaging other components in your electrical system. For example, a short could damage the converter/charger, resulting in the inability to charge your batteries.
Mastering your travel trailer’s battery switch is a crucial skill for any RVer. By understanding its function, performing regular maintenance, and knowing how to troubleshoot common problems, you can ensure a smooth and reliable power supply for all your adventures. Remember, safety is always the top priority when working with electrical systems, so always take the necessary precautions.
Happy travels!
Quick FAQs
What happens if I leave my battery switch in the “off” position?
Leaving the switch off completely disconnects your house batteries from the trailer’s electrical system. This prevents any drain on the batteries, which is good for long-term storage, but means nothing will work off the batteries.
Can I use jumper cables to jump-start my travel trailer battery?
Yes, but be extremely cautious. Follow the correct procedure to avoid damaging your electrical system. Consult your owner’s manual or a qualified technician if unsure.
How often should I clean my battery terminals and switch?
Ideally, inspect and clean your battery terminals and switch at least twice a year, or more frequently if you notice corrosion or performance issues.
What type of fuse should I use for my battery switch?
The correct fuse type and amperage will depend on your specific battery switch and electrical system. Always consult your owner’s manual or a qualified electrician.
